I've definitely met my goals for today, having worked 4 + hours on projects today.
At the shop desk, I worked on a new Steampunk Pin Prototype, but I'm not sure if I'm going to put the piece into production. I also packed a work kit for the weekend as I need to make new Chatelaines and Brooches for 2011.
I finished the hem saver on my blue moire Civil War ballgown and during the weekend I'll hand pleat the waistband and perhaps begin working on applying the ribbon trim (test example shown on the right), though I'm not sure the pattern...straight or curved lines, or perhaps a peyote or scalloped.
Tomorrow is the HT Gala and hopefully both my husband will feel better (bout of either the stomach flu, or flu-like illness) and the rain will hold off until after the new year.
This blog is about my personal and business projects for three of my reenacting periods, American Civil War as part of the 1st United States Sharpshooters, Company C/Berdan's Aide Society, Steampunk (based in the Late Victorian/Edwardian with some Dieselpunk thrown in) and The Society for Creative Anachronism (SCA)
Friday, December 31, 2010
Wednesday, December 29, 2010
NYR Day 1
I finished two Mary Todd Lincoln Brooch prototypes today. A simple version of the necklace; made of 1 large, 3 medium, and 5 small medallions is progressing well. I've got one more pearl medallion to bead before I begin setting bezels. I also spent a couple of hours getting my work area back in shape to begin jewelry production for 2011. A few pearl brooches and a at least one necklace should be ready for the Gallowglass Booth @ ReenactorFest 7
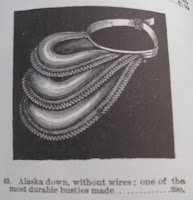
Tomorrow's project will be working on an bustle inspired from a 1886 Bloomingdale's Catalog (see image at the right) and putting together some more placket pockets, as well as working on the hem savers for two new hoop skirts, before packing my striped silk ballgown for the Timekeeper's New Years Eve Gala.
Photograph of Mike and I, President's Birthday Ball in Rockford, IL 2009
Tuesday, December 28, 2010
New Years Resolutions...early
If you are wondering why I've not posted to this blog for a while, let me catch up a bit. Back in August I injured my left shoulder and after a bit of medical mayhem the doctor's figured out I didn't have a sprained shoulder or thankfully a rotator cuff injury. Instead, I had to strengthen a whole group of muscles especially my left biceps. Since I'm left handed it made doing many normal things painful and I had to stop sewing until my physical therapy ended in mid-December. I'm still not 100% but I am able to get back to work on "stuff".
I've decided to make my NYR a simple one for 2011 - Sew new clothing and create new jewelry creations for at least 20 hours per week (in addition to the normal course of running the business including going to shows, new sales listings and of course shipping and receiving). It should add up quickly and I have a big list of projects and places to go over during the winter.
Projects for Winter 2011 (and the event deadline)
- Make sure the silk ballgown fits if the new one isn't done. Have the special pearl brooch finished.
- Get my brain in order for the Sharpshooter Winter Meeting (Jan. 9th)
- Make sure my dress fits for 12th Night
- Bead Stringing and Paternoster Class and Workshop to be taught at The Festival of Maidens (Jan 22nd). The class will focus what bead material and shapes would have been appropriate during the SCA time frame of 600 - 1600; while the workshop will focus on bead stringing techniques and period correct findings.
- Blue Moire Ballgown (ACW) with handmade trim by the Midwest Civilian' Conference (Jan 28 - 30). This dress just might get done this week......
- Check the Fabric and Trim Inventory for the Vogue Fabric Trip February 12th
- Burgundy and Floral Day Dress (ACW)
- Civil War Red Wool Soldier's Coat (ECW) - for Mike
- Lecture Notes and Examples for Creating a Mid-Victorian Wardrobe for Ladies and Gentlemen
- Lecture Notes and Examples for A Brief History of Lace
- New Stock for the Gallowglass Booth including petticoats, placket pockets, bustles, bustle overskirts, waistcoats, jewelry and hat pins
- for Military History Fest (aka Reenactor Fest) 7
Wednesday, October 20, 2010
The Pearls of Mary Lincoln
I've been working a bit lately on some jewelry lately inspired by a Pearl Demi-Parure (picture to the left). This is part of the The Alfred Whital Stern Collection of Lincolniana at the Library of Congress. I'm mostly focused on the Necklace for right now.
I've also focused on another Tiffany Pearl Necklace that was made around the same time (picture to the right).
The picture with the green background on the left is my first attempt was to emulate the brooch in the right-hand picture. Since it's a test it's made from glass instead of real pearls. I will have to use smaller pearls for the 3-tier oval...but overall I'm happy with the first try. Overall the brooch ended up being being about 40 x 30 mm.
Learning from the mistakes of 1.0 I've recently completed several smaller 2.0 pieces (see picture to the right). The background is the printed picture of the first image used in today's blog post. I just ordered a bunch of Lacy Brass Bezel findings and some gorgeous flower connectors for version 3.0. I plan to order the Swarovski Crystal Pearls I need for this project next week.
Tuesday, October 19, 2010
New Steampunk Jewelry & Civil War Recap
I've not been posting much as of late. I managed to mess up my left shoulder on the Sunday of the Rockford Air Show and have been "hobbled" by it ever since. I begin physical therapy on October 20th and we will see how it goes. I thought I might post recaps for a couple of day to get back into the swing of things!
New Steampunk Jewelry
I do have to show off some of the new Jewelry I've been working on. My jewelry is available in my Etsy shop, and my Ebay Store. You can also Antina's Uniques and Costuming Jewelry @ Windy-Con in the Traditional Treasures booth. Also we will have some pieces at the Rock-Con Convention, October 22nd-24th, 2010.
both of these pieces will be available on Ebay by 10/21/2010
Civil War Reenactments
The 2010 Civil War season as draw to a close for Company C, 1st United States Sharpshooters. All of the tents and gear have been packed away for the winter and now it's on to winter projects. Here were the Reenactments we (as in Mike and I attended in 2010
New Steampunk Jewelry
I do have to show off some of the new Jewelry I've been working on. My jewelry is available in my Etsy shop, and my Ebay Store. You can also Antina's Uniques and Costuming Jewelry @ Windy-Con in the Traditional Treasures booth. Also we will have some pieces at the Rock-Con Convention, October 22nd-24th, 2010.
both of these pieces will be available on Ebay by 10/21/2010
Civil War Reenactments
The 2010 Civil War season as draw to a close for Company C, 1st United States Sharpshooters. All of the tents and gear have been packed away for the winter and now it's on to winter projects. Here were the Reenactments we (as in Mike and I attended in 2010
Naper Settlement, Naperville, IL (May) (thanks to whoever got this picture for me)
Battle of Morseville, Stockton, IL (October). If you are wondering, Mike and I are drilling on the Stadia Sight after working on Skirmish Drill with the Iowa Battalion. (thanks to Kate Moan for the picture)
Our last event of the season was a Saturday Day trip to the Shadows of the Blue and Grey, in Princeton IL. (Thanks to Jamie Rott for the Photos)
~Antina
Reclaiming Our Heritage, Milwaukee, WI (June)~see my fencing outfit for the Fashion Show in older postings....
Civil Wary Days @ Lakewood Forest Preserve, Wauconda, IL (July)~(where the truck broke down on the way home......)
We didn't do any Civil War in August due to my injury and a death in the family.
Lehmann House Civil War Event, Lake Villa, IL (September) (thanks to Michka Bailey for taking this picture for me!). We are brigaded with Company E/USS Carondelet.
Battle of Morseville, Stockton, IL (October). If you are wondering, Mike and I are drilling on the Stadia Sight after working on Skirmish Drill with the Iowa Battalion. (thanks to Kate Moan for the picture)
Our last event of the season was a Saturday Day trip to the Shadows of the Blue and Grey, in Princeton IL. (Thanks to Jamie Rott for the Photos)
~Antina
Wednesday, June 2, 2010
Fencing Outfit Completed!!!!!
Normally I've been posting a day by day account of my work, but over the holiday weekend I decided to wait until the outfit was finished. There were some nice breaks (such as a baby shower and the Southern Wisconsin Airshow).
In the picture research I've accumulated, it's hard to tell what lies under the Plastron. I've made some deductions based on some Late Victorian/Edwardian garments I have in my collection. Plus, since I also practice the Western Martial Art of Rapier, I've incorporated some of what I've learned in making Rapier Clothing.
I made the decision to construct a calf-length gored skirt with a double-width panel in front and 2 regular sized panels on each side, with the closure along the back seam. There is also an shorter, flounced petticoat under the skirt to give a little extra body and keep some of the material away from the legs.
For the shirt, I constructed a loose-fitting smock style shirt. I choose a smock style since I could close in all the seams, leaving less of a chance of a foil getting into places it should not. I cut the sleeve cuff on the bias to allow some stretch when pulling the garment over the knuckles, but still allowing the shirt to be tucked into my gloves.
All and all the project was an easy one for me. Sewing time for the skirt and shirt (including finished seams, and some handsewing) was just over 2 1/2 hours for each garment.
Since the project wasn't that intensive, I thought I would fix a sheer green plaid gathered bodice (Civil War) dress that I wore in England. The dress was pretty, but the bodice was much too big. So, removing the piping along the bottom edge, brought in the side seems and repleated/gathered. Now all I have left to finish tonight is the handwork-hand tacking the piping back in place.
Tuesday, May 25, 2010
Victorian Fencing Fashion.
I have to confess, I've been putting off my Late Victorian Fencing Costume. Now it's crunch time and I need to have the dress completed for the Reclaiming our Heritage at the VA Medical Center in Milwaukee, Wisconsin, June 5th and 6th. This event is a multi-timeline event and we are attending as part of our American Civil War unit, The 1st United States Sharpshooters, Company C.
My main goal is to complete my Late-Victorian Fencing Costume and perhaps one other dress (more on that later).
To start my project I wanted to duplicate a period plaston. According to The Sword Exercise Arranged for Military Instruction, by Henry C. Wayne and published by the US Government in 1850 (available on Google Books as a download)...
"A PLASTRON made of soft leather on the outside, of strong linen underneath, stuffed to the thickness of half and inch with hair, well quilted to keep it in place, but not so tight as to make it stiff and inflexible, for those who require more security that a jacket will afford. It should cover the breast from the throat to the waist, and be fastened by straps and buckles around the neck, back and waist."
I did some searching on the Internet and did find books and pictures/illustrations of Victorian Women in fencing attire. I drew up a pattern from these pictures.
Since I've not been able to find an original Victorian Era Plastron, I'm not sure how what weight the leather and linen are or what type of hair was used (I suspect it's horsehair). After hunting around in my fabric stash and doing some shopping I decided to use some white "Ultrasuede" I had on hand for the inside of the Plastron and machine quilted cotton fabric for the outside.
After cutting and a bit of fitting, the two parts of the garment were basted together (with the bottom left open), the shoulder straps were pinned, the basting stitch opened up and the straps inserted then restiched. Turning the garment right side out, I topstitched all of the basted seams (skipping the bottom again). The straps were tested (yes they fit without the need for buckles) and I moved on to the hip ties. Once those were attached, I set the garment on the dressform for a test run. I think the hip ties may have to go higher (to the waist), but right now they look to be in the correct position; according to my photos at least. Finally, I used some wide twill tape to sew the hem, leaving the ends open for an additional tie.
Now it's off to bed and tomorrow I will tackle the beige fencing skirt.
Some new Steampunk Jewelry!
Here is a tray of Steampunk Jewerly we sent with Traditional Treasures up to Wiscon this coming weekend. I'm still finding my way but I will have more exciting offerings this year @ the Cyphan Convention! Stay Tuned.
Saturday, April 10, 2010
Steam Century Mystery Night Is Here!!!!
Mike and I had a great time this evening at the the Mystery. We listened to beautiful music, great storytelling, and made many new acquaintances! The HMA Badger were excellent hosts and we hope to be back for one of the future Mysteries. The next Mystery at Midway Village is set for July 17th. Information can be found on the SCM Page.
We also helped out Gallowglass Academy with the Bartitsu Demonstration this evening. Bartitsu is the martial art style possibly used by Sir Arthur Conan Doyle's, Consulting Detective, Sherlock Holmes. Interested in more information? There happens to be a Bartitsu class going on April the 17th. If you are interested you can check out the class information
Mike and I left early, wearing a new corset while still dealing with a lingering cold is tiresome. However, we look forward to crossing into the realm of Steampunk again soon.
Besides getting my new Civil War Dresses done for Naper Settlement, I have my next Steampunk projects in the works.
I think I may put the Jacket aside and focus on something a bit more Edwardian. My mother-in-law gave me The Edwardian Modiste as a recent birthday present and I have picked a dress out of the book.
Or I will go with a dress I just love from Victorian Fashions and Costumes from Harper's Bazar, 1867-1898, the picture is dated 1889.
I also have a fencing outfit to complete....also from Harper's Bazaar and also from 1889.
Friday, April 9, 2010
Day 12 (Steam Century Mysteries is tomorrow)
Accessories make the dress, so pulled out a hat from my early reenacting days. I purchased the hat before I learned that I should be wearing bonnets, not brimmed hats (save for the swallowtail style and those for riding). So this hat has sat in it's hat box for 15 or more years. Now it has a purpose. I put together some Steampunk Style decoration and hat pins to bring it inline with the outfit I will be wearing on Saturday Evening.
The outfit still needs a few extras, such as googles, but I've not found something I like....I will post pictures of the outfits soon.
Thursday, April 8, 2010
Day 11 (3 days from Steam Century Mysteries)
Ouch...okay sewing gremlins I get it! I officially give up on trying to finish my new Steampunk jacket after I drove a quilting pin almost 3/4 of an inch under the nail of my left middle finger. It's gross and I'm bleeding and it HURTS. So I just have to concede and wear one of my backup outfits. I will just have to premier the bustled jacket at Cyphan in June.
I have two backup outfits, one the bustle dress I wear for Bartisu Demonstrations with Gallowglass Academy and the other is a co-pilot costume that is more mid-1930's. Since my husband will also be doing a 1930's style costume I think we should match. I will be sure to post pictures of us on Saturday.
But for now I think I will put the sewing to the side. I leave to visit my little sister in California and I should pack and get ready for that too. This blog will go quiet for a few weeks until I get back and then it will be a race to next dresses finished up for the Naper Settlement Civil War Events. They include a burn out floral day dress and a couple of new calico work dresses.
Wednesday, April 7, 2010
Day 10 (4 days from Steam Century Mysteries)
It's done...It's done....It's done...It's done....The Corset is finished! There were some headaches and lots swearing along the way. But the corset is wearable. Honestly, I still need to cover my eyelets but that can be done later. Of course, now that this one is done I know where I need to change things to have the corset fit and look better; but that will be for version two. For now I am as happy as I can be.
As for the jacket the test fabric/lining will go together tomorrow. I really think I have a shot to finish as long as the basement stays dry!
Tuesday, April 6, 2010
Monday, April 5, 2010
Day 8 (6 days from Steam Century Mysteries)
What happened to Day 7 you ask? It was Easter Sunday was a day of rest, family and celebration. No new sewing to report. Not to mention my head cold sucked!
Today, I helped my friend Donna create her first garment for Civil War Reenacting. A work stay from Past Patterns. It's an easy item to make, requiring no busk or boning and will allow her to acclimate to the tight clothing of the period. When she left today she had the bias/cording and eyelets to put in. I am so very proud that I could help walk her through the process. I also loaned her one of my work dresses to try on.
As for my corset. Most of the fixes are in and I've started to work on the dress jacket. Right now with such a short window I have to consider this may not get done in time. With this in mind, Mike and I created a backup plan for me, just in case my cold and schedule get the best of me.
Saturday, April 3, 2010
Day 6 (8 days to go before Steam Century Mysteries)
Well nothing much to report today. A Spring cold cracked me up side the head big time. Then, as I was about to put the boning in I noticed things were not right and I had to rip out several seams because a piece had been sewn in upside down. That has been fixed and tomorrow the boning and busk will go in!
Friday, April 2, 2010
Day 5 (9 days until Steam City Mysteries)
What's fun about making a corset....nothing. Now wearing a well-fitting corset is another matter. I really don't have too much to report today. I spent most of my time serging, sewing seams, casing steel boning (and the busk) before calling it quits. At least by the end of the day, my project had the basic shape of a corset. Tomorrow's goal is to sew in all the boning/busk I cased today. I wonder how many needles I will break.
Thursday, April 1, 2010
Day 4 (10 days before the Steam Century Mysteries)
Today was a mixed bag in the goals department.
1. Embellish the buttons for the jacket-I have enough of some items, and not enough of others. I took the Pewter buttons (as purchased on the left) and washed them in a bit of Ultramarine Ink to match a bit more with the jacket material and then picked up some embellishment items. I didn't have enough of one of the components to make the buttons match, but that will be fixed tomorrow (completed button on the right).
2. Have my test corset fit @ SCA Practice. Lisa did the fitting for my modified Victorian Corset Pattern from Past Patterns. It went well, with only a few pins here and there. I am very pleased with the results. And the best news is I don't have to cut apart the test piece for pattern pieces!!!
3. Re-cut the corset pattern. I'm taking a break from cutting to update my blog, but the pieces will be cut before heading to bed tonight.
4. Boning and busk layout. I took my steel supplies with me to practice but didn't have the chance to layout the boning (I have too much fun practicing with Rapiers!). This will also be finished up before I head to bed.
My goals for Good Friday are simple...not. Corset Sewing and drafting the Jacket Pattern from the 1889 Garment Patterns book or seeing if I can make some major drafting changes to Simplicity's Civil War Pattern 2887.
Day 3, Part 2 (11 days before Steam Century Mysteries)
After a Birthday Dinner with friends and watching Sherlock Holmes with the husband; I got to work by first sewing on the internal lacing of my bustle. I still don't think I have the correct tension, but I know the lacing needs to stretch a bit.
After tying up the bustle, I went to work sewing the back pleats of the underskirt and giving them a spin on the dress form. Much better!! The final fitting and the waistband will have to wait for the corset and the petticoats layers.
The goals for Thursday (Day 4) will be:
1. Embellishing the 12 large pewter buttons I bought at the Kalamazoo Living History Show
2. The corset fitting @ SCA Practice.
3. Re-cut the corset in the proper material
4. Boning and Busk layout is correct.
On a final note, here is a sample of the fabric for the jacket and over-skirt of my bustle dress. Shown in this photo are the right and wrong sides. I am not sure yet, which is which!
Subscribe to:
Posts (Atom)